

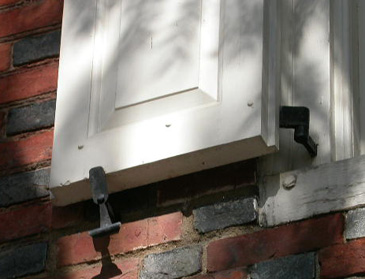
Most shutter hinge problems are measuring problems wearing a disguise. The shutter will not open all the way, or it stands off the wall like it is trying to leave, or the open shutter hides half the window trim, and in nearly every case the hardware simply was not dimensioned for the house it went on. The good news is that only three measurements matter, and none of them requires anything fancier than a tape, a straightedge and a little patience.
This article explains offset, standoff and throw in plain terms, shows how we measure each one in our shop, and walks through how those numbers become a hinge and pintle that fit. Whether you are hanging new shutters on a new house or rehanging old ones on a brick row house, a few careful minutes with a tape will save you a return shipment and a lot of aggravation.
Three words worth learning: offset, standoff and throw
Shutter hardware has its own vocabulary, and these three terms carry most of the weight. Learn them once and every hardware catalog, ours included, starts to make sense.
- Offset is the total distance the shutter travels outward as it moves from closed to open. It is typically the distance from the face of the casing to the outermost surface of the structure.
- Standoff is how offset gets built into the hardware. The pintle standoff and the hinge standoff, added together, equal the total offset.
- Throw is the sideways movement of the shutter edge as it swings from closed to open. It decides whether the open shutter neatly frames the window or hides the trim.
Here is how each one is measured, with the standard dimensions we stock.
| Dimension | Measured from | Measured to | Our stock sizes |
|---|---|---|---|
| Offset | Face of the casing | Outermost surface of the wall | Sum of pintle and hinge standoff |
| Pintle standoff | Base of the pintle, where it meets the mounting surface | Centerline of the pin (or female cavity) | 1″, 1-1/2″, 2″ and 3″ |
| Hinge standoff | Back of the hinge, as it lies on the shutter | Centerline of the hinge barrel | 0″ (flush), 1″, 2″ and 3″ |
| Throw | Offset bend in the hinge | Centerline of the hinge barrel | 1-1/2″ standard |
| Hinge length | Edge of the shutter (the bend) | End of the hinge | Made to suit the shutter |
Start with your installation situation
Before you measure anything, figure out how your windows sit in the wall and how you want the shutters to close. The rules never change: the shutter must lie parallel to the window when closed and nearly parallel to the face of the building when open. Virtually every installation we have configured comes down to a few combinations:
- Window flush, shutter inset. The window is flush with the face of the wall and the shutter closes inside the frame. Common on historic frame houses, very secure, but the shutters must be fitted exactly.
- Window flush, shutter proud. The shutter closes on the outside of the casing. The New England approach; easy to install, and shutter size is not dictated by the frame.
- Window recessed, hardware on the casing. The shutter must swing outward to clear the depth of the masonry opening, so offset comes into play. We tend to discourage this approach when the offset exceeds about 6″, because the open shutter applies too much leverage to fasteners in the casing.
- Window recessed, hardware on the masonry. The pintles mount to the face of the brick, stone or stucco, and the shutter closes into or over the opening. Shutter leverage is greatly reduced, storm windows are not in the way, and the integrity of the window is not compromised.
A flush window with flush hardware needs little or no offset; the shutter swings like a door. Recessed windows are where the measuring gets serious. Our installation guide has sketches of every situation if you want to match yours.

Measuring offset
Offset is the measurement that sinks most installations, because brick and stone openings are rarely plumb and never perfectly flat. A single tape reading at a convenient spot will lie to you. Here is how we do it:
- Lay a straightedge across the face of the wall beside the window, spanning the opening.
- Measure from the face of the casing (where the pintle will mount) out to the straightedge. Do this at the top, middle and bottom on both sides of the window.
- Take the greatest dimension you find, not the average.
- Add about 1/2″ of cushion for irregularities in the construction.
The consequences of error are not symmetrical. If the offset is too small, the shutters will not open fully; they hit the wall before they lie flat. If the offset is too great, the shutter still works fine and simply sits off the wall a bit. We think it is good practice to set shutters at least 1″ off the face of the structure anyway, so air circulates across the back of the shutter.
Measuring one window and ordering for the whole house. Old masonry walls vary from opening to opening, and sometimes from top to bottom of the same opening. Measure every window, write the numbers on a sketch of the elevation, and send the largest figures. Nobody has ever regretted an extra quarter inch of offset; plenty have regretted a missing one.
Splitting offset into pintle and hinge standoff
Once you know the total offset, it has to be divided between the two pieces of hardware. The pintle stands the pin away from the casing; the hinge has a sharp bend that moves its barrel away from the face of the shutter by a matching amount. Pintle standoff plus hinge standoff equals total offset.
Virtually all commercially available shutter hardware ships with matching standoff on the hinge and pintle. That assumes the face of the closed shutter lies on the same plane as the casing, which seldom happens in contemporary construction. The wrong hardware goes up, and the homeowner hears, "Well, you'll never close them anyway." We custom-fit the hinge and pintle standoffs to each customer's situation, which eases installation and makes sure the shutter actually works.
A simple example: suppose your greatest measured offset is 2-1/2″ and you add the 1/2″ cushion, for a 3″ total. That could be a 2″ pintle with a 1″ hinge, or a 1″ pintle with a 2″ hinge, depending on where the closed shutter sits relative to the casing. When we have to juggle standoffs between the two, we usually adjust the hinge, because it is much easier to vary the hinge standoff than the pintle's. Pintle standoffs other than our stock sizes are available too, but they carry an upcharge.
Getting the throw right
Throw is the left-to-right movement of the shutter edge as it swings. Too little throw, and the open shutter covers the window molding. Too much, and a stripe of brick or siding shows between the open shutter and the window frame. Proper throw lets the open shutter comfortably frame the window without hiding its detail.
Throw is split, half built into the hinge and half derived from where the pintle is located. Our standard throw is 1-1/2″, meaning the centerline of the hinge barrel is 1-1/2″ from the offset bend. That figure is based on a standard 3″ casing: with the pintle centered on a 3″ case, the hinge spans 1-1/2″ to meet the pin while the shutter seats within the window, and the full 3″ of casing shows whether the shutter is open or closed. Change the numbers and the picture changes. On a 4″ casing with the throw set at 3″, for instance, one inch of the casing would be covered when the shutter is open.
On recessed windows there is one hard limit. The throw cannot exceed the width of the window casing, or an offset hinge will hit the corner of the masonry before the shutter can lie flat against the wall. So measure the casing width carefully, side to side, at the point where the pintles will go.
Hinge length, stiles and the first fastener
With offset and throw settled, the remaining measurements come from the shutter itself.
Hinge length
We measure strap hinge length as the portion of the hinge that actually lies on the shutter. On an offset hinge, the bend generally falls on the edge of the shutter, so length is from the bend to the end of the strap. Historic strap hinges were generally sized to span one half to two thirds of the shutter width, and that remains a good rule for both looks and strength. Hand work carries some variance; we can generally hold the measured length of a strap hinge to within 1/2″.
Stile and rail widths
On louvered and raised-panel shutters, the vertical frame members are stiles and the horizontal ones are rails. Send us the stile width. All the weight of the shutter is borne between the pintle pin and the first fastener on the hinge, and we place that first hole 1-1/4″ from the offset bend, which centers it on a 2-1/2″ stile, the most common width we see. Structurally it only needs to land on solid wood, but it looks best centered. Rail width matters too, because surface-mounted strap hinges should sit comfortably on the rail. Our strap hinge holes are 9/32″, which leaves room for finish inside the hole plus a 1/4″ fastener.
Hinge width and the item number
Our heavy strap hinges and pintles come narrow (1-1/2″) or wide (2″), and the pintle pin height matches. The item number encodes your measurements: a 705-N-12-1 is a 705 storm strap, narrow, 12″ long, with a 1″ standoff. The full list of standards lives on our standards and finishes page.
When the house already has pintles
On an old house, the best measuring tool may already be screwed to the window. Original pintles tell you most of what you need. The height and diameter of the pin equal the hinge barrel dimensions. The distance from the face of the casing to the centerline of the pin is the standoff. The horizontal distance from the pin to the edge of the shutter defines the throw. All the required dimensions are built into the pintle.
If you find female cups just beyond the junction of the window frame and the wall, you are in luck. Those belong to notched hinges, a very common approach through the 19th century, and they are almost all 1/2″ in diameter by 1″ high, which matches our standard notched hinges. Leave them in place and the installation becomes a drop-in. For more on reading the evidence an old house leaves behind, see our article on identifying historic shutter hardware, and for how all the pieces fit together, our guide to functional shutter hardware.
Frequently asked questions
What happens if I order too much offset?
The shutter will still open, close and lock properly. It will simply sit a little farther off the wall when open. That is why we suggest adding about a half inch of cushion and setting shutters at least an inch off the wall for air circulation.
Is standoff the same as offset?
Not quite. Offset is the total distance the shutter travels outward, while standoff describes each piece of hardware. The pintle standoff plus the hinge standoff adds up to the total offset.
Do I need offset hinges on a frame house?
Often not. When the siding does not protrude beyond the face of the casing, no offset is needed and the shutter opens like a door. Recessed windows, typical of brick and stone houses, are where offset becomes essential.
Why does the throw matter if the shutters open fine?
Throw controls how the open shutter frames the window. Too little throw and the shutter covers the window molding, too much and a strip of wall shows between shutter and frame. On recessed windows, too much throw can stop the shutter from opening flat at all.
Send us your numbers
We would much rather make hardware once than make it twice, and we really do not like to ship more than once. Sketch your window, note your offsets, casing width, stile width and shutter size, and call us at 610-948-5116 or send the details through our contact page. Even if you think you have no questions, call; it is always better to settle the details before the iron goes in the fire.