

Shutter Installation Guide
How shutters can be most easily mounted to function properly on any structure — and how to work out the offset your hardware needs.
Functional shutters mount to the structure and swing freely to close over the window or door. The shutters must be parallel to the window in the closed position and nearly parallel to the face of the building when open. Those are the rules, and every one of our installation options follows them.
You’ll only see one or two installation options from other shutter hardware purveyors, because most are selling the same limited lines of imported hardware. We offer unique approaches because we make the hardware that makes the shutters work. Re-thinking the way the shutters install — they don’t have to hang from the window frame — can save time, money and effort. Be creative and find the simple solution; it’s always the best.
Six installation situations
Find the one that matches your windows. “Inset” shutters close inside the opening; “proud” shutters close on the face of the casing or wall.
Window flush, shutter inset (FI)
Hardware mounts to the casing; the shutter closes within the window frame. Probably the most common approach on historic frame structures. With the shutters closed into the frame and locked from inside, they could not be opened from outside or lifted off their hinges — a very security-conscious approach. The catch: the shutters must be fitted exactly, and the frame needs a pocket deep enough for the full thickness of the shutter.
Window flush, shutter proud (FP)
Hardware mounts to the casing; the shutter closes “proud” on the casing. The New England approach. Shutters aren’t trapped in the frame, so they’re less secure — but their size isn’t dictated by the window frame, stock shutters often work perfectly well, and installation is very easy. Why New England? We believe letting the shutters “float” outside kept them from binding in the frames during frost heaves.
Window recessed, shutter inset (OI)
Hardware mounts to the casing; the shutter closes within the window frame. The most common historic approach on stone or brick, or where windows were recessed in frame structures. The shutter must lie parallel to the window when closed, swing clear of the recess, then lie nearly parallel to the wall. That clearance — the offset — is built into the hardware. We discourage this approach beyond about 6″ of offset: the open shutter applies too much leverage to fasteners in the casing.
Window recessed, shutter proud (OP)
Hardware mounts to the casing; the shutter closes proud on the casing — often because storm windows fill the frame, or the shutters sit in the frame but protrude past the face of the casing. A tricky installation, but the right hardware makes it work.
Masonry mount, shutter inset (MI)
The hardware mounts to the face of the building and the shutter closes into the masonry opening. A very attractive approach for brick, stone or stucco. Storm windows are not an issue, the window warranty isn’t compromised, and shutter leverage is greatly reduced. New-generation fasteners make this a simple, very secure installation, and adjusting the throw covers or exposes any portion of the wall face.
Masonry mount, shutter proud (MP)
Again the hardware mounts to the structure, but the shutter sits proud of the opening, so shutter dimensions aren’t critical. For storm protection, having the perimeter of the shutters backed by the structure greatly increases the rigidity of the closed shutters. In both masonry installations, storm locks can be mounted to reach from inside or outside.
Offset & hinge calculator
Offset is the total distance the shutter travels outward from closed to open — typically from the face of the casing to the outermost surface of the structure. It’s built from the pintle standoff (casing face to the centerline of the pin) plus the hinge standoff (shutter face to the centerline of the barrel).
Throw is the sideways movement of the shutter edge. With the pintle centered on a 3″ casing, our standard throw is 1-½″, so the full casing shows whether the shutter is open or closed.
When measuring brick or stone, look for the greatest dimension and allow about ½″ cushion — openings are rarely plumb and never perfectly flat. We like open shutters at least 1″ off the wall so air can circulate behind them.
Installing strap hinges, step by step
The same sequence works for board-and-batten shutters and barn doors. Lift-off hardware means you can hang and remove shutters at ground level.
Confirm the situation and measurements
Choose your installation situation, then measure offset (with ½″ cushion on masonry), casing width, stile and rail widths, and shutter width. Send them to us before you order.
Mount the pintles
Pintles carry the weight. Set them plumb and in line with each other so the shutter swings true. On masonry, keep anchor holes well away from corners and edges of the brick.
Position the hinges on the shutter
Hinges sit on the rails or battens. Our first fastener hole is 1-¼″ from the offset bend, landing on the mid-line of a typical 2-½″ stile. The 1/32″ clearance between pin and barrel is there to protect the finish — take it up when positioning.
Hang and check the swing
Drop the hinges onto the pintles. The closed shutter should lie parallel to the window; the open shutter nearly parallel to the wall, at least 1″ off it for air.
Add hold-opens and locks
Mount shutter dogs one half to two thirds of the way across the open shutter (or side-mount where there’s no room below), then fit locks so the closed shutters actually work.
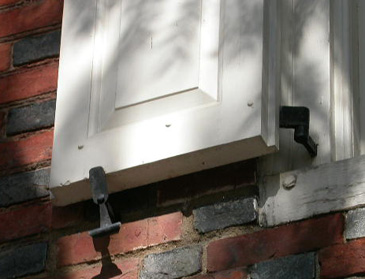
Hinges in masonry
Too often we’ve seen old brickwork cracked and spalled by bad pintle placement and design. Our notched hinge-and-pintle combination — an historic favorite from the post-Civil War period into the early 1900s — is the hardware we recommend for masonry. The notched pintle is scaled to put sturdy anchor holes well away from the corners of the window, and the open shutter hides the pintle completely.
For brick, stone or stucco walls, a masonry-mounted pintle also keeps fasteners out of the window itself — important when a new window’s warranty is at stake.